Your packaging artwork is ready, the box size is decided, and you’re almost ready to print. But how will the printer know where to cut the cardboard, place the folds, or join the panels?
That’s where a dieline comes in.
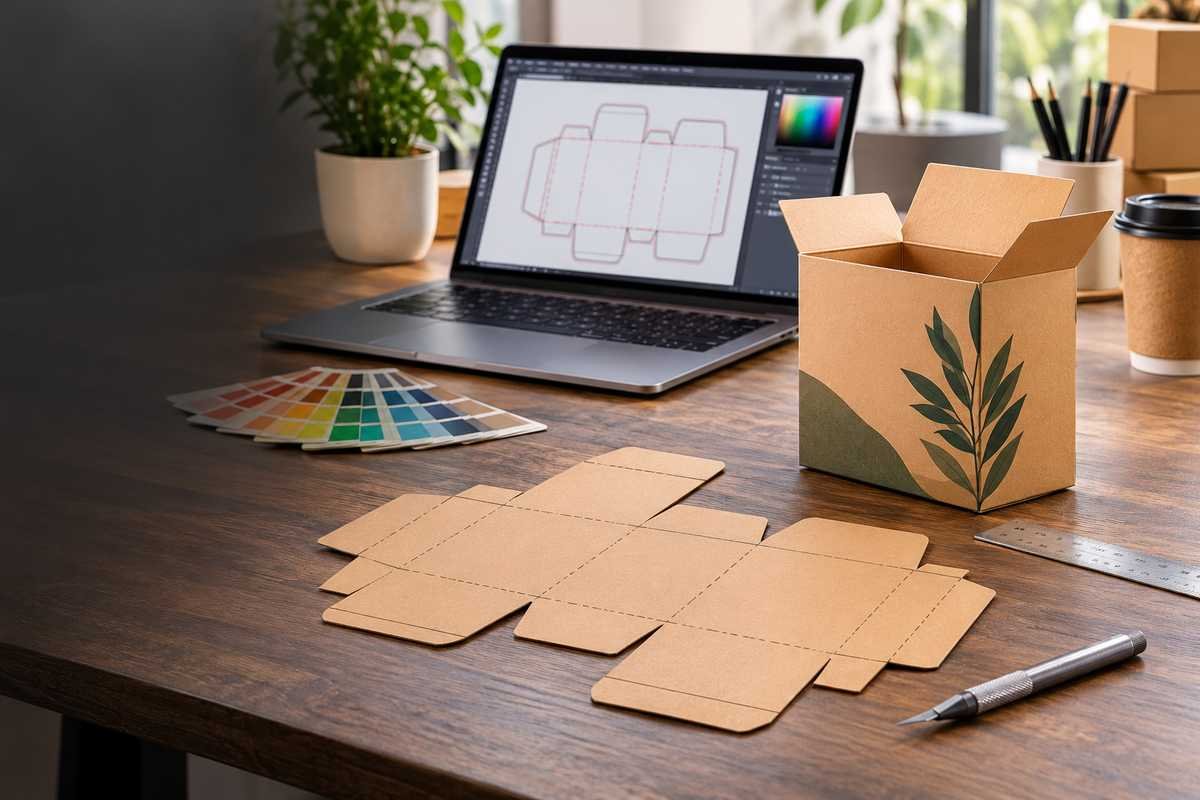
A dieline is a technical layout that maps out the cuts, folds, and assembly points of a package before production. It helps turn your box design into a structure that can actually be manufactured.
If you’re ordering custom packaging, knowing how to read a dieline can help you catch mistakes before they affect your finished boxes.
What Is a Dieline and What Does It Show?
A dieline is a flat drawing of a package that shows how its individual panels fit together. It includes the cutting paths, fold positions, flaps, and other details needed to build the box.
For example, a custom soap box may have a front panel for the brand name, side panels for product details, and tuck flaps for closing the package. The dieline shows where each section belongs before the box is printed and assembled. A packaging dieline also provides a guide for placing artwork, so graphics appear on the correct surfaces.
The key difference: Your packaging artwork determines how the box looks. The dieline determines how the box is shaped and assembled.
How Does a Dieline Work in Packaging Production?
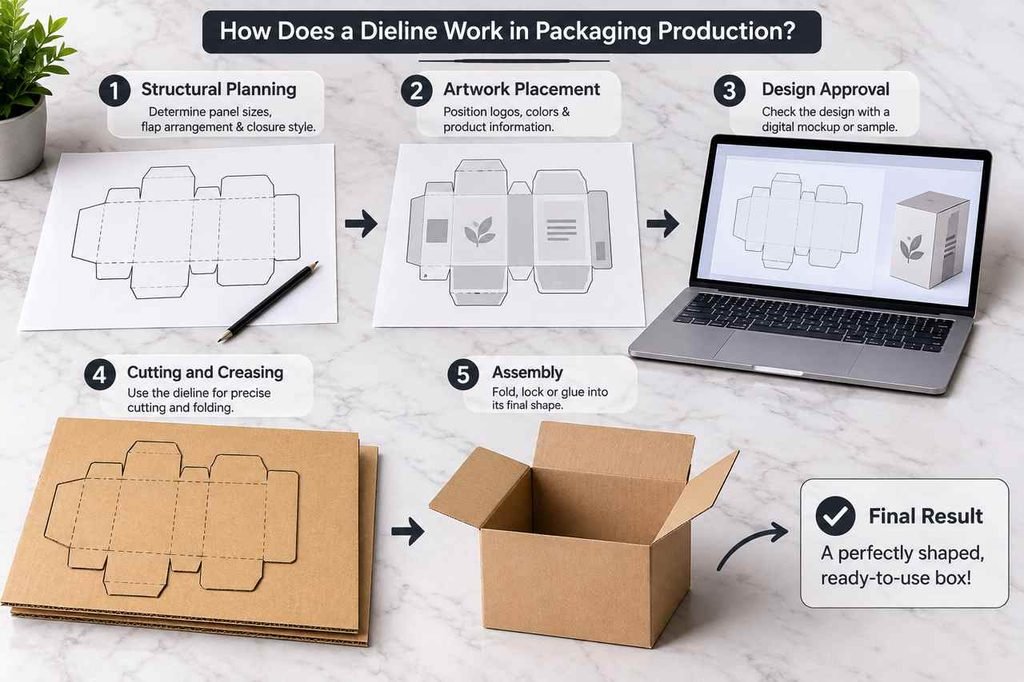
A dieline is used at several stages of packaging production, not just during cutting.
1. Structural planning: The designer determines the panel sizes, flap arrangement, and closure style.
2. Artwork placement: Logos, colors, and product information are positioned on the correct panels.
3. Design approval: A digital mockup or physical sample helps check the box before manufacturing.
4. Cutting and creasing: The approved structural layout guides the preparation of cutting and folding operations.
5. Assembly: The finished packaging blank is folded, locked, or glued into its intended shape.
This process helps identify problems early. For example, a box might look attractive in a digital design but fail to close properly because its flap dimensions are incorrect.
How to Read the Lines on a Packaging Dieline
You don’t need to be a packaging engineer to understand the basic markings. Each type of line tells the production team what should happen to a particular area.
| Marking | What it means |
| Cut line | The edge or opening that must be cut |
| Fold or crease line | Where the material needs to bend |
| Bleed boundary | How far printed artwork extends beyond the cut edge |
| Safety margin | The area that keeps important content clear of trimming |
| Perforation line | A section designed for controlled tearing |
| Glue area | Where adhesive may be applied during assembly |
Cut Lines and Fold Lines
Cut lines define the final shape of the packaging blank. Fold lines show where that blank bends to create the box. These operations must be clearly distinguished. A cutting path placed where a fold is needed could make the packaging unusable.
Bleed Lines and Safety Margins
Bleed protects edge-to-edge artwork from small trimming variations. For many packaging projects, a common starting allowance is 3 mm (approximately 0.125 inch) beyond the cut edge. The actual requirement should come from your printer.
Safety margins work in the opposite direction: they keep important text, logos, and barcodes away from edges where they could be cut off.
Perforations and Glue Areas
Perforations are used for tear-open features or removable sections. Glue areas identify where panels need to be joined with adhesive. These areas may require special attention because some printed coatings can affect glue adhesion.
Important: Line colors differ between manufacturers. Don’t assume that a red line always means folding or that a black line always means cutting. Check the legend supplied with the dieline.
What Information Do You Need Before Making a Dieline?
Before starting a dieline design, gather the information that affects the finished box.
Product Dimensions
Measure the product’s length, width, and height. Include any inserts, padding, or protective materials that will sit inside the packaging. Also confirm whether the requested box dimensions refer to its inside or outside measurements.
Packaging Material
A folding carton made from paperboard and a corrugated mailer box won’t use identical structural allowances. Material thickness affects how the box folds and how closely its panels fit.
Box Style
Decide how the package should open and close. A tuck-end carton, a locking mailer, and a packaging sleeve have different panel arrangements. Choosing the structure first prevents unnecessary redesign later.
Printing and Finishing Requirements
Tell your packaging supplier if the design includes special finishes, windows, perforations, or adhesive areas.
These features may affect the dieline or artwork setup.
Who Should Create Your Packaging Dieline?
A packaging designer, structural designer, or manufacturer can prepare a dieline. If you’re using a standard box style, the manufacturer may already have a suitable template that can be adjusted to your required dimensions.
For unusual shapes or more complex packaging, a custom structural design may be necessary. You can create a basic layout yourself, but it should be reviewed before manufacturing. A file that looks correct on screen may still need changes for material thickness, folding clearances, or cutting equipment.
Best practice: Ask your packaging supplier for the approved dieline before placing the final artwork. This reduces the chance of designing graphics around the wrong box dimensions.
Also Read: Packaging symbols explained
How to Create a Packaging Dieline: Step-by-Step
Once you have the box dimensions, material, and packaging style, you can begin creating the dieline. The goal is to develop a flat layout that folds into the intended box without gaps, overlapping panels, or misplaced flaps.
Step 1: Start With the Right Box Template
Choose a packaging dieline template that matches your box style. A tuck-end carton, mailer box, and display box all have different panel arrangements. For standard packaging, an existing manufacturer-approved template is usually the easiest starting point. For unusual shapes, a custom structure may be required.
Step 2: Set the Panel Measurements
Enter the box dimensions using the measurement units requested by your printer. For example, a carton with an internal size of 5 × 3 × 2 inches needs panels designed around those dimensions. The flat layout will be larger because it also includes closure flaps, a glue tab, and allowances for the material. Do not calculate the final flat size by simply adding the product dimensions. The exact measurements depend on the box construction and board thickness.
Step 3: Build the Flat Structure
Arrange the body panels in the correct order and add the required top and bottom closures. For a typical folding carton, this may include four connected body panels, dust flaps, tuck flaps, and a side glue tab. Make sure each section connects to the panel it will meet during assembly.
Step 4: Mark the Production Paths
Identify every cutting, creasing, and perforation operation. Use separate vector paths or layers as required by the manufacturer. Keep structural markings independent from the printed artwork. This helps prevent a fold from being mistaken for a cut during production.
Step 5: Check the Assembled Shape
Create a paper sample or use a 3D packaging preview to examine the structure.Check whether the panels meet correctly, the flaps close, and the product fits inside. A digital mockup helps with visualization, but a physical prototype made from the intended material is better for testing the actual fit and folding behavior.
How to Create a Dieline in Adobe Illustrator
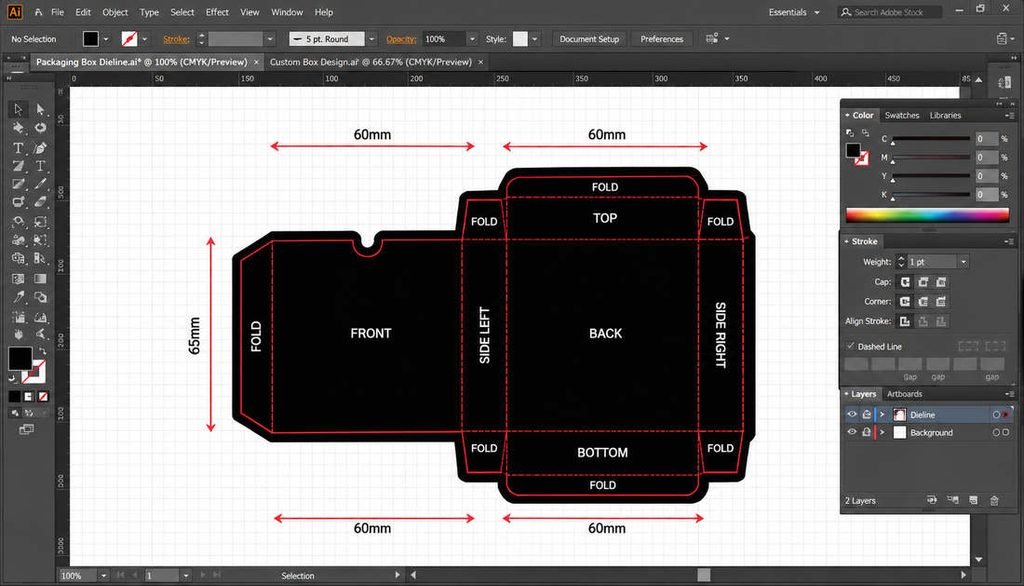
Adobe Illustrator is useful for working with packaging dielines because it supports precise vector paths and separate artwork layers. For professional production, it’s usually best to open a dieline supplied or approved by the manufacturer rather than building a complex box structure from scratch.
1. Open the Dieline File
Open the supplied AI or compatible vector PDF file in Illustrator. Check the dimensions and confirm that the file is displayed at its intended size. Avoid resizing the dieline to make the graphics fit. Structural changes should be approved by the packaging supplier.
2. Set Up the Artwork Layers
Keep the packaging artwork separate from the cutting and creasing information. A simple setup might include an artwork layer, a cut layer, and a crease layer. Add separate layers for perforations or other operations when required. Lock the approved structural layers while working on the design to prevent accidental changes.
3. Apply the Artwork
Place the logo, product details, colors, and images on the appropriate box panels. Check the direction of the artwork, especially on flaps that will rotate when folded. Extend edge-to-edge backgrounds into the required bleed area, and keep important text away from cuts and creases.
4. Check Colors and Structural Lines
Use the printing color settings specified by the manufacturer. CMYK is common for printed packaging, while special inks may require spot colors. Cutting and creasing paths may also use named spot colors, but these are production instructions rather than visible printed artwork. Confirm the required swatch names and settings with your printer.
5. Save the Production File
Save the editable Illustrator file and export a suitable vector PDF if requested. Make sure the required images and fonts are embedded, outlined, or otherwise supplied according to the printer’s instructions. Keep the dieline paths editable and do not merge them into a flattened image.
Which Software Should You Use for Dieline Design?
Different programs serve different purposes in the packaging workflow.
| Software | Best for |
| Adobe Illustrator | Preparing vector artwork and editing simple dielines |
| ArtiosCAD | Engineering custom box structures and production layouts |
| Pacdora | Exploring box templates and generating visual mockups |
| Esko Studio | Previewing packaging artwork on 3D models |
For straightforward packaging artwork, Illustrator may be enough when you already have an approved template.
For complex structural packaging design, specialized software such as ArtiosCAD is more appropriate. Photoshop can be used to edit product images and background graphics, but a raster image alone is not a suitable replacement for the precise vector paths required by most dieline production workflows.
How to Prepare a Print-Ready Dieline
Before sending your file for printing, make sure the artwork and structural layout are ready for production.
Check the actual size. Confirm that the dimensions match the approved box specifications.
Keep the artwork within safe areas. Text, logos, and barcodes should have sufficient clearance from cuts, folds, and glue areas.
Review the bleed. Any background that reaches a trimmed edge should extend to the printer’s required bleed boundary.
Preserve the vector paths. Cutting and creasing information must remain usable by the production team.
Check images and fonts. Make sure linked images are available and fonts are handled according to the printer’s file requirements.
Confirm the output format. AI and vector PDF are commonly used, but some manufacturers require additional structural file formats.
Check both sides when necessary. If the packaging has inside and outside printing, confirm the correct artwork orientation and whether separate layouts are required.
Before final approval, ask the manufacturer to review the file against its production specifications.
How to Review a Packaging Dieline Before Approval
You don’t need to inspect every technical setting yourself, but you should be able to answer four important questions:
- Will the product fit? Confirm the internal dimensions and any space needed for inserts.
- Will the box close properly? Check the flaps, locking tabs, and glue areas on a sample.
- Will the artwork appear correctly? Review the front, back, sides, and top of an assembled mockup.
- Is the latest file approved? Make sure the artwork and structural layout use the same final revision.
For a new packaging design, request a physical sample whenever practical. It’s much easier to correct a folding or fitting issue before the full order goes into production.
Dieline vs. Die Cutting: What’s the Difference?
A dieline is a digital design file, while die cutting is the manufacturing process that gives packaging its final shape.
The dieline tells the manufacturer where cuts and creases belong. Die-cutting equipment then uses the approved structural information to process the packaging material.
| Dieline | Die Cutting |
| A digital structural layout | A physical production process |
| Prepared before manufacturing | Performed during manufacturing |
| Defines cuts, folds, and panels | Creates the required cuts and creases |
For example, a window box dieline identifies the opening where customers will see the product. Die cutting creates that opening in the packaging material.
Also Read: Converting Milliliters to Cups
What Happens After a Dieline Is Approved?
Once the dieline and artwork are approved, the manufacturer prepares the job for production.
1. Tool preparation: For conventional die cutting, the approved layout is used to produce a cutting tool with the required cutting and creasing rules.
2. Printing: Artwork is printed onto the selected packaging material using the appropriate printing method.
3. Cutting and creasing: The material is processed to create the box outline, openings, and fold positions.
4. Waste removal: Unwanted material is separated from the packaging blanks.
5. Folding and gluing: The blanks are assembled or prepared for later assembly, depending on the box style.
The exact order can vary with the material, finishing options, and manufacturing equipment.
Common Dieline Mistakes That Can Affect Your Boxes
A small error in the file can cause problems across an entire packaging order. Here are five mistakes worth checking before approval.
1. Designing Around the Wrong Box Size
Using outside measurements when the supplier expects inside dimensions can affect product fit.
Avoid it: Confirm the measurement convention and test the product inside a sample.
2. Ignoring the Board Thickness
Thicker packaging materials need suitable folding allowances. Without them, panels may not align or closures may feel too tight.
Avoid it: Have the structure checked against the actual board specification.
3. Placing Graphics Across Critical Areas
A barcode near a crease, a logo on a glue tab, or small text beside a cut edge can create problems in the finished package.
Avoid it: Review the artwork on an assembled mockup, not just the flat file.
4. Changing an Approved Template
Moving a crease or resizing a flap can affect the entire box structure and may require changes to the cutting tool.
Avoid it: Request a revised dieline from the manufacturer rather than editing approved structural paths without confirmation.
5. Approving the Design Without Testing It
A box can look correct on screen but still be difficult to assemble.
Avoid it: Check a physical sample before mass production, especially for a new box style.
Final Dieline Checklist Before Printing
Before approving your packaging design, make sure you can answer yes to these questions:
- Are the box dimensions and material specifications confirmed?
- Does the sample fit the product and close properly?
- Are all cuts, creases, and perforations correctly identified?
- Is the artwork positioned on the intended panels?
- Do backgrounds extend into the required bleed?
- Are logos, text, and barcodes clear of unsafe areas?
- Are the structural paths preserved in the requested vector format?
- Are the artwork and dieline from the same approved file revision?
If anything is unclear, ask your packaging supplier to review it before production begins.
Final Thoughts
Creating a successful packaging dieline starts with the right information: accurate dimensions, suitable material, and a box structure that works for the product.
You don’t need to design every technical detail yourself. What matters is understanding the layout, reviewing the artwork carefully, and approving a structure that has been properly tested.
Planning your next packaging project? Confirm the dieline specifications with your packaging supplier before finalizing the design, and explore more packaging guides on Search Packaging.
Frequently Asked Questions About Dielines
What is the purpose of a dieline in packaging?
A dieline provides the structural information needed to cut, crease, and assemble packaging. It also helps designers place printed artwork on the correct panels.
How do you read a packaging dieline?
Start by identifying the cut and fold paths. Then check the bleed, safety margins, glue areas, and any perforations. Use the manufacturer’s line legend because colors and markings can vary.
Can I use a packaging dieline template for any box size?
Not without checking it. A template may be adjustable, but changing dimensions can affect flaps, folding allowances, and assembly. The revised structure should be approved before production.
What software is used to create dielines?
ArtiosCAD is used for professional structural packaging design. Adobe Illustrator is useful for vector artwork and simple dieline editing, while tools such as Pacdora can help with templates and visual mockups.
Is a dieline necessary for digital printing?
Digital printing does not eliminate the need for accurate packaging structure information. If the printed material must be cut or folded into a box, an appropriate dieline or equivalent cutting layout is still needed.
Can a dieline be made in Photoshop?
Photoshop can prepare images used in packaging artwork, but production dielines generally need precise vector paths. Illustrator or dedicated structural design software is more suitable for that work.
Who approves the final packaging dieline?
The customer typically approves the intended design and packaging requirements, while the manufacturer checks the file against its production specifications. Responsibilities should be confirmed before production.
Is a dieline the same as a packaging mockup?
No. A dieline defines the flat structure of the package. A mockup shows how the assembled package will look, while a physical prototype can also test its fit and function.